Monday 31 August 2015

All aboard

The theme for the Simon Says Stamp Monday Challenge is Ticket Please!  And I feel as though I am rushing to get on board on time, getting my entry linked up with literally only a few minutes to spare!  It reminds me of the time we missed our bus while travelling in Chile, but this theme brought back some great memories of those times.  So that's what inspired me for my entry.

Here's my card...

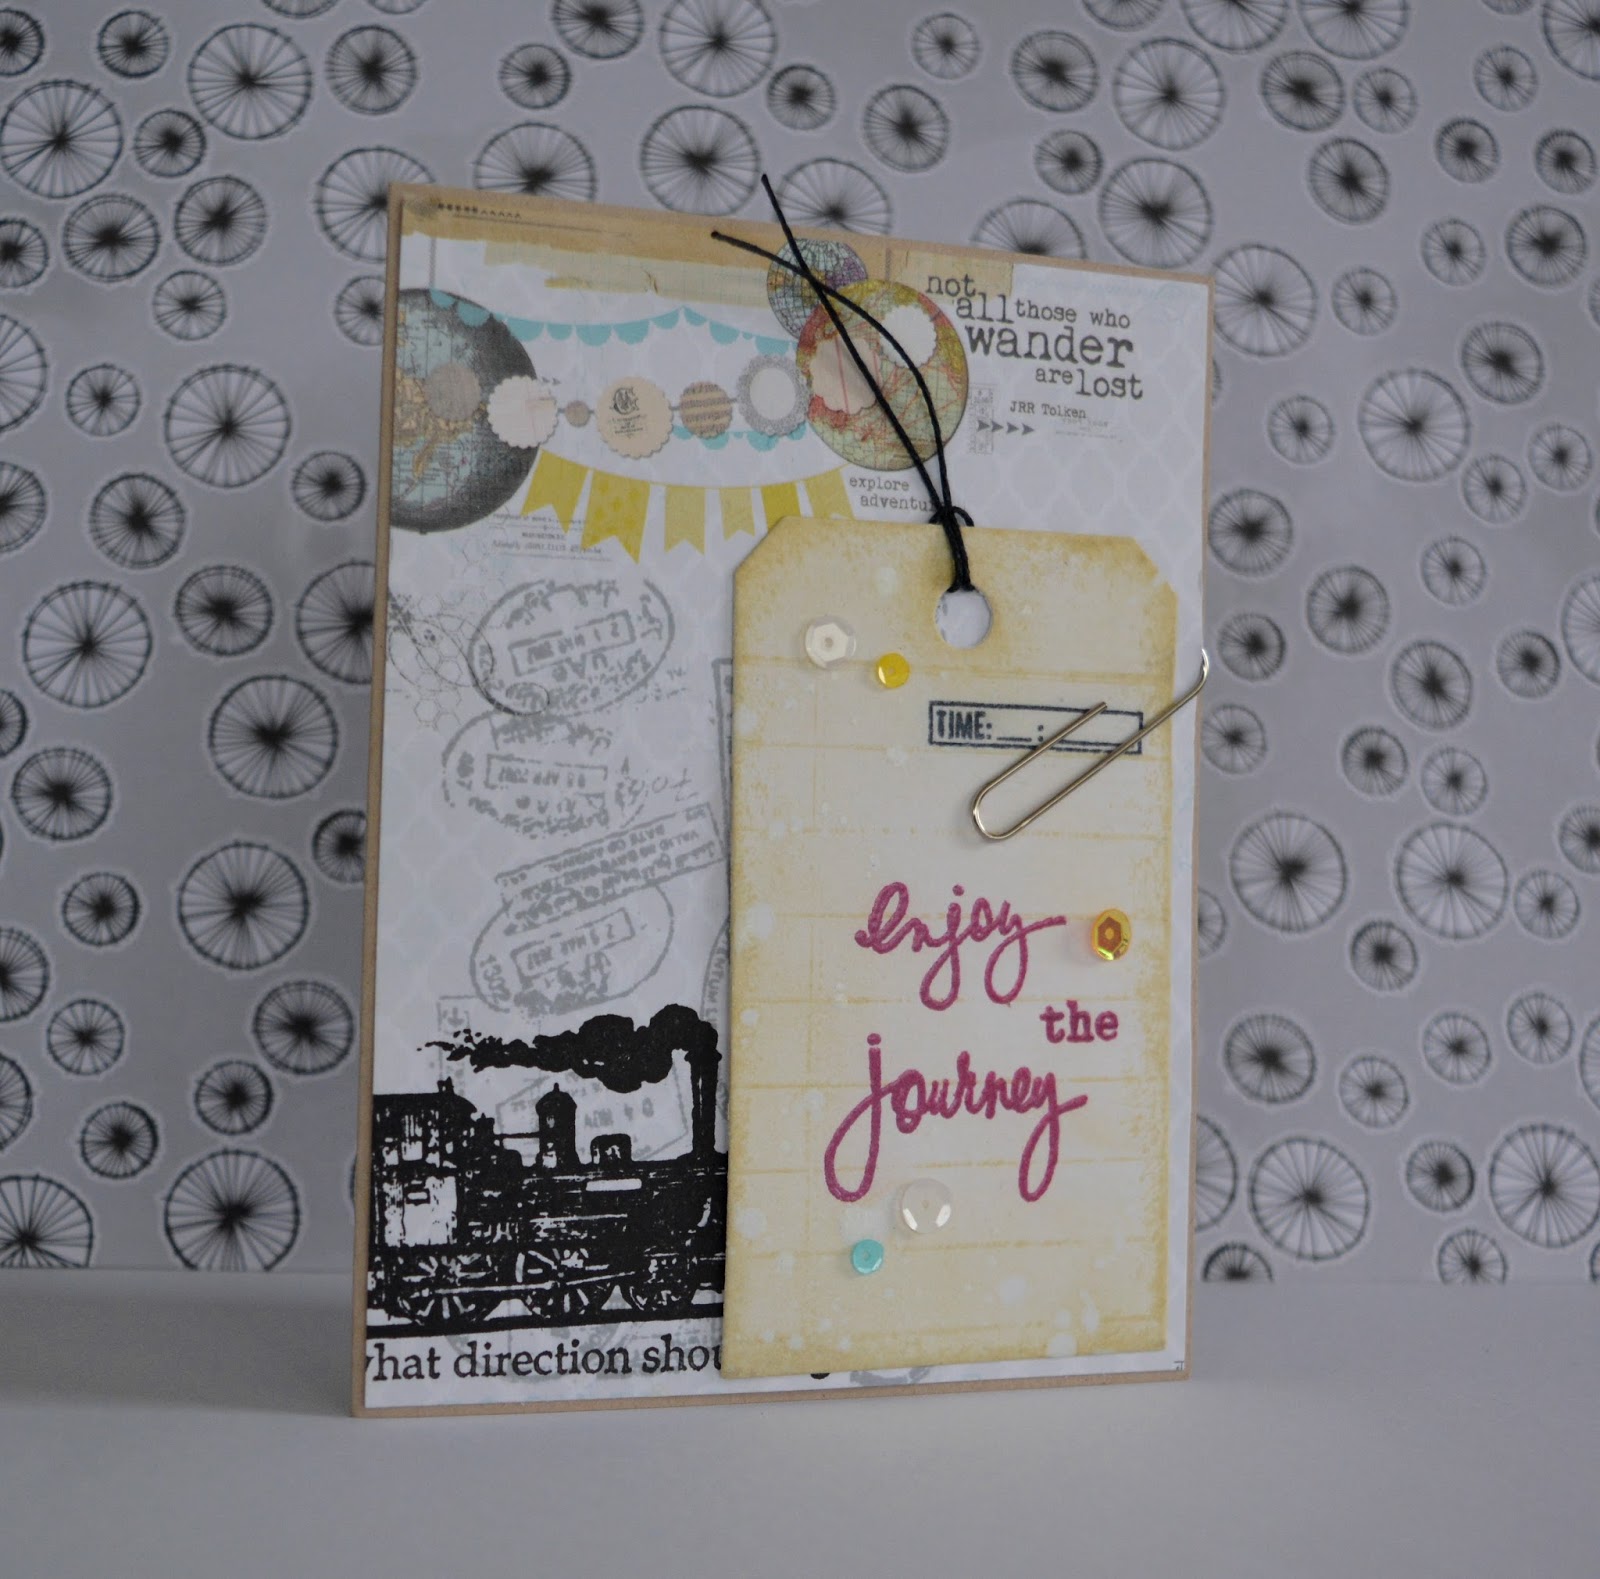
I cut and scored Neenah Desert Storm for my notecard.  For the background layer I used 6x6 patterned paper from My Mind's Eye: Follow your Heart - Be Amazing.  I stamped the Vintage Passport from Unity Stamps in Hero Arts Soft Granite and then added the steam train and the small sentiment in black Versamark.
I die cut and stamped with Antique Linen Distress Ink the Memory Box Distressed tag, which I believe is discontinued, but I love because it is a larger size than my other tags.  I ink blended a bit more Antique Linen over the tag and around the edges.  For the main sentiment I used a combination of words from two Heidi Swapp, Hello Today Collection clear stamp sets (Journey and Together), heat embossed in Zing metallic red embossing powder.
Some black hemp twine, a large paperclip, a spritz of Hero Arts Unicorn white ink spray and a few sequins from Pretty Pink Posh Sunny Days mix to finish off the tag and I adhered it to the card base loosely with a few glue dots in the corners.

I really enjoyed getting in to the vintage swing of things with the Simon Says Stamp Monday Challenge, and creating this card reminded me of the adventures I had on the other side of the world many years ago.  Maybe one day I'll be able to do it all again.

Thanks for checking out my card!

Tuesday 25 August 2015

Swerving stitches

The other day I was re-visiting an old Online Card Classes video from Clean and Simple Card Making and I saw a cute card from Julie Ebersole where she folded the coloured side of the cardstock on the inside of the card, and used a punch along the front edge, revealing the pop of colour inside.  I have never really done this, so I  had been thinking about how to translate this idea in to a design of my own.
I just received an order from Paper Smooches the other morning with the Stitched Dies, and I realised that this could be the perfect match.  Not to mention I could totally make this idea work with the sketch for current Paper Smooches SPARKS Challenge!

http://papersmoochessparks.blogspot.co.nz/http://papersmoochessparks.blogspot.co.nz/2015/08/august-23-29-designer-drafts-challenge.html

I've also been trying to use up some of my stash lately.  I have heaps of random paper!!  Patterned paper, glitter paper and colours of cardstock I barely use.  And it's taking over the world.  Well, maybe only my shelves.  But I just need to get it outta here, so I incorporated some of this paper into my card here...


I cut my notecard from Hero Arts Shallows layering paper, and scored and folded it with the colour on the inside.  I used the wavy die from Paper Smooches Stitched dies along the opening edge and then cut off the extra in line with the stitching.  I repeated the die on two panels of We R Memory Keepers Inked Rose 6x6 patterned paper and also one more top panel from Neenah Solar White, on which I also cut the straight stitch die down the straight edge.  I layered these up and adhered them to the notecard.
I stamped the sentiment from Paper Smooches Group Hugs clear stamp set in Hero Arts Butter Bar Shadow ink and die cut a few mini hearts with the Love & Cherish Die from Paper Smooches.  I added a coat of Glossy Accents to the hearts and allowed them to dry before adhering them around the sentiment.

You can see a bit of the soft aqua colour from inside the card peeking out.  It was a bit more difficult to photograph this card, showing the inside.  I couldn't really get good light in my regular spot so I needed to change things up a bit.  I set up a backdrop à la Laura Bassen, with a piece of 12x12 Amy Tangerine patterned paper and it worked out kind of cute.  And it's so versatile, I can move around the house to wherever I get the best light at any particular time of day.  Definitely will try this again.

That's all for now.  Thanks for checking out my card, and please feel free to leave me a comment!

Jars of colour

I just managed to complete a card for another challenge I had been thinking about.  This time I created a card for the Sparkle & Shine Challenge, which is perfect for me because I'm a total magpie, I love all things shiny and sparkly!!  The challenge inspiration photo is shown below.  I loved the mason jars and the colour scheme, and the chalk caught my eye too.
http://sparkleandshinechallenge.blogspot.co.nz/

http://sparkleandshinechallenge.blogspot.co.nz/

I had a few ideas floating around in my head for this one, but not all of them worked out as well as I had hoped.  I tried real chalk for the sentiment, using the technique shared by Tim Holtz for Online Card Classes Creative Chemistry 2, but it was such a craft fail, I decided to stick with the white embossing powder instead!  It ended up being a fairly simple card, which is awesome because sometimes these things just take on a life of their own and become very complex, when they don't need to be.

Here is my finished card...

I stamped the front of a white notecard with Hero Arts Studio Calico Chevron cling stamp (which I seem to be using a lot at the moment, btw) with Hero Arts Charcoal Shadow Ink.
I cut a second slightly smaller layer from black cardstock and die cut my mason jar from Paper Smooches Crystal Clear.  I stamped my sentiment from Paper Smooches Sending Sunshine, in Versamark and heat embossed in white.  I adhered the layer to my notecard and stamped the mason jar outline in the negative space.
Then I added my sparkle.  I used Lemondrop and Aquamarine sequins from Pretty Pink Posh, then I realised I was out of Watermelon, so I had to cheat a little and colour some Marshmallow ones with a pink Copic marker.  Oops, better get shopping!

I love the white sentiment on black cardstock, just like the old fashioned blackboards.  I guess they're a thing of the past at schools now though.  I can't even imagine what they'll be using when my daughter starts school!

Thanks for checking out my card and have a great week!

Monday 24 August 2015

Oranges and lemons...and limes

The weekend has come and gone and it's Monday again.  I still have a lot of half finished cards to complete, that are either drying, or being flattened in a book or waiting for some embellishment or other!

Anyway, in the nick of time I have finished my card for the Simon Says Stamp Monday Challenge.  I loved playing with this colour combination for the Citrus with a Twist theme.

Here is my card...

For the background I used Hero Arts Studio Calico Chevron cling stamp, inked up with Distress Inks in Squeezed Lemonade and Twisted Citron.  I spritzed with a mini mister before stamping, to get a slight bleed with the colours.
I masked off the flower on the Inkadinkado Vintage Bottle Flower stamp and just stamped the bottle part of the image in Distress Mermaid Lagoon.  I used a water brush to pull in some of the colour over the bottle.  I cut it out and covered with a layer of Distress Clear Rock Candy Crackle paint and left to... crackle.  I stamped one of the flowers from Simon Says Stamp Summer Garden clear stamp set, coloured with Copics and fussy cut out.  I adhered these elements to the background, popping up the flower with foam dots, and I drew in the flower stem with a Copic marker. I stamped the sentiment from the Paper Smooches Spreading Sunshine set, which I got free with my last order over $60!!  I adhered the background panel to my notecard made from the darkest colour card from the Hero Arts Sunshine mix layering paper.
Final touch was to add some Wink of Stella to the centre of the flower and a few sequins from Pretty Pink Posh around the sentiment.

Time to go and work on finishing a few more cards.  I am so glad I have started taking part in the challenges, because it really inspires me to create something different.  And I am building up a good collection of cards, ready for any occasion.

Thanks for taking the time to check out my card!

Friday 21 August 2015

Dino thanks

So I've been struggling this week to get back to my cards.  I haven't had a lot of free time, but I've got around to finishing one card so far.
I have had this cute little Paper Smooches triceratops dude coloured and cut out for a while and I really wanted to give him a home, so I thought he could enter in this week's Paper Smooches SPARKS Challenge.
The theme is Anything Goes... the perfect place for a dino!

http://www.papersmoochesstamps.comhttp://papersmoochessparks.blogspot.co.nz/

Here is my finished card...

I die cut and stamped the dino from the Paper Smooches Cuteasaurus stamp set and coordinating dies.  I coloured him with Copics, added lime green Stickles to his horns and stuck on a googly eye for fun.
For the background I used Tim Holtz Chevron layering stencil, with some Deco Foil transfer adhesive squeezed on to an ink blending tool.  I pounced it over the stencil to give a light spongy effect.  Once dry, I used some Heidi Swapp Minc gold foil to rub over loosely. Using my tan embossing mat, I ran the cardstock and stencil through my Cuttlebug to give some more texture to the background.
I cut the Paper Smooches Thanks word die from black card and inlaid it in the background panel.  I tucked the vellum banner in behind the dino, with the "you are awesome" sentiment from the same Cutesaurus set stamped in Staz On.  I adhered the background panel to some Neenah Desert Storm and added some black strips to top and bottom of the panel.  Lastly, I hit all the black cardstock with Wink of Stella!


I had loads of fun with this lil guy and I plan to repeat this card design with some different colour foils and other character die cuts.

Thanks so much for checking him out, and please feel free to leave a comment!

Sunday 16 August 2015

When life gives you lemons

I've really been getting my craft on over the weekend.  I've had the chance to make another card, combining two challenges.  I was inspired to do something completely different with this card.  Firstly, I wanted to use a clear stamp set from Kaisercraft called Nan's Favourites that I have never ever used before, despite it being one of the first stamp sets I ever purchased.  I also have seen some examples of eye-catching cards showing  no-lines colouring, and I wanted to give that a try too.  So I put them together and here's what I got...!

I started off by repeat stamping three rows of the leaf border image from Lawn Fawn And a Partridge in Versacolor Atlantic pigment ink on Neenah Solar White.  I added the sentiment from Technique Tuesday Tree-mendous in Versafine black and set aside to dry completely.  No smudges for me please!!

For the lemons, I inked up my stamp with Distress ink Squeezed Lemon and then stamped on a piece of masking paper and stamped again on a small piece of cardstock for a lighter image.  I cut out the mask that I already stamped and placed it over the lemon on cardstock.  I used a leaf image from Paper Smooches Reflections clear stamps, which I inked with Hero Arts Green Hills shadow ink and again, stamped off to the side and used the second generation stamp for my outline.  I then coloured with Copic markers, fussy cut around the image and adhered to the card base using foam dots.

For my first attempt at no lines colouring, I kept it small and simple, but I was pretty happy with the result.  It is a technique that I think looks really effective, and I will definitely try it again.

I would like to submit this card for two challenges; CAS(E) this Sketch! and the Simon Says Stamp Monday Challenge, where the theme is Homegrown Summer.


http://casethissketch.blogspot.co.nz/2015/08/case-this-sketch-136.html


That's all for now, but no doubt I won't be able to stay away for long.
Thanks for checking out my creation.

Saturday 15 August 2015

Cupcakes... yum

I received a shipment of goodies earlier this week including the Avery Elle Cupcakes clear stamp set and coordinating dies.  I have been dying to create with this set, so I thought I would use them for the AEIHeartU Challenge.  Although I must say, I really feel the need to bake some actual cupcakes now!

AEIHeartU Challenge

Here is my yummy card...

 
I used a background technique that I picked up from the recent OCC Background Check series.  I dry embossed a piece of Tim Holtz watercolour card using the Cuttlebug Swiss Dots folder with a homemade embossing diffuser to leave a circle space in the centre with no imprint.  I watercoloured the circle with Distress ink Picked Raspberry.
On another piece of card I stamped the cupcake case with Versamark and applied light blue embossing powder. I stamped and heat embossed the candle in white and then masked off the candle and the top of the cupcake case with masking paper.  I stamped in the middle part of the cupcake and heat embossed in white also.
I watercoloured the icing with Distress ink Squeezed Lemon and brushed over with Wink of Stella once dry.  The candle was carefully coloured with Copics and given a coat of Glossy Accents.  I fussy cut the finished cupcake and adhered with foam dots to the background.
I cut the Simon Says Stamp folded banner from Bazzill vellum and heat embossed the sentiment from the Avery Elle Storybook stamp set with silver embossing powder to compliment the charcoal notecard.  I attached the banner with glue dots and added Doodlebug Cupcake Glitter Sprinkles embellishments to hide the glue dots.

I am planning to give this card to a friend who has her birthday in a couple of months.  She loves to bake, so this card will be right up her alley.

Thanks for stopping by!

Wednesday 12 August 2015

Picture Perfect Challenge

Another weekend flashed by us and we're almost half way through August already!  I've had a slightly ill little girl for the last few days, so we have been relaxing at home, keeping warm and dry, which has given me a bit of a chance to do a bit more card making.

I decided to enter the Paper Smooches Stamps SPARKS Challenge this week, which was a picture perfect challenge.  I love the Paper Smooches cute designs and so I really enjoyed participating in this challenge.


This is the inspiration photo...


Here is the card I created...

I stamped and cut a selection of flowers and leaves from the Paper Smooches Reflections stamp set and coordinating dies.  I also used the pocket shape from the Paper Smooches Pocket Dies set and cut it from Ranger Sticky Back Canvas.  Using washi tape for masking, I ink blended random stripes on the canvas and frayed the edges out a little.  I then adhered the canvas and all the die cuts to some kraft cardstock using different thicknesses of glue dots and foam dots on the flowers to get a layered look.  I added the Paper Smooches Thanks word die cut from black cardstock, adhering with some Multi Medium Matte.  I stamped "a bunch" in Versafine black and finished off the edges by drawing the stitching with a white gel pen.

Well, that's all for now.  Time to go and clean up my craft desk!


Friday 7 August 2015

Final Background Check

Online Card Classes Background Check is almost finished, just waiting for wrap up day now.  Thankfully I was able to catch up and make some great cards to showcase for Day 6.
At some stage I will go back and review all my past classes too, just to refresh my memory.
Also, Online Card Classes is having a Flash Sale this weekend, so I have enrolled in a few of the older classes to complete independently when I have some free time. 

A negative side effect of all this frantic card making and photographing is the enormous pile of clean laundry to be folded and put away.  But I will have to catch up on all the chores after the weekend!
Tomorrow I am heading off to a fermentation workshop, learning how to make real sauerkraut, fermented pickles and kombucha.  I am excited to get a brew going soon.

Here are a couple more cards that were inspired by Background Check...

This card was taken from Kristina Werner's Day 4 card design.  I created the background by repeatedly die cutting the Simon Says Stamp Pointed Feathers die.  I then placed a panel behind which was watercoloured using Distress Inks in Tumbled Glass and Peacock Feathers.  I added a strip of kraft card and the Hugs die cut sentiment from Lawn Fawn.  Finally I added the stitching with white gel pen.


This card was inspired by Shari Carroll's Faux Letterpress technique.  The background was embossed using Simon Says Stamp Full Card Triangles die.  I used Copic markers to colour the balloon and cloud images from Lawn Fawn's Blue Skies and white heat embossed the sentiment from Simon Says Stamp Furry Cat and Box clear stamp set.
This card I will be entering in the Simon Says Stamp Wednesday Challenge.  This week's theme is Tie it Up.

Next week perhaps I should work on my photography!

Background Check

I am loving participating in Background Check from Online Card Classes.  So many techniques to try out that I had never even thought of.  I have made several backgrounds and a few cards but I am pushing to catch up on everything as I started a few days late.

It sure is hard to find time for crafting with an 18 month old, who always wants to be the focus of your attention.  So the cards get done mostly at night time, however the light is pretty terrible, so it can be difficult.  I definitely have to do the photos during the daytime though.

Anyway, I will do as much as I can before class wraps up and I am sure I will use the techniques again in the future.  And I will have made a stash of beautiful cards in the process.

Here are my cards from Day 3 and I will post my cards from Day 6 when I finish them.

This card was created using ink blending from the centre of the background.  I found this tricky to begin with, but I wasted several practise sheets of card and finally got there.  I used Distess inks in Squeezed Lemon, Dried Marigold and Worn Lipstick for the background.  The images from Avery Elle Storybook were stamped and coloured with Copics and adhered with foam dots.  The sentiment was from the same Avery Elle set.  I fussy cut the images and tied some hemp twine to the balloon, which I inserted under the rabbit's paw by making a small cut with my craft knife.


This background was created using Distress ink pads in Worn Lipstick, Picked Raspberry, Shaded Lilac, Dusty Concord and Peacock Feathers pressed on my craft sheet and spritzed with water.  I placed the watercolour card directly to the ink on the craft sheet and "smooshed" it several times, heat setting in between until I got the look I liked.  I added the vellum die cut heart and white heat embossed the Damask stamp from Impression Obsession.  The Thanks die cut sentiment was from Paper Smooches.


My final card used an ombre resist technique shown by Jennifer McGuire.  I used Hero Arts Tweed Design block stamped with Versamark and heat embossed in white for the background.  I used an ink blending tool to create an ombre effect with Distess Inks in Stormy Sky, Faded Jeans and Chipped Sapphire.  I die cut a circle from both the panel and the card base and inserted an acetate window sandwiched between.  I die cut the Simon Says Stamp Happy craft die and coloured lightly with Stormy Sky.

I am looking forward to watching the rest of the videos and putting my new skills to use!

Thursday 6 August 2015

First Post!

I have finally decided to start a blog to showcase my crafty endeavours in card making.  I started scrapbooking several years ago while living in Vancouver, Canada.  After some overseas travel, I had collected several boxes of tickets, maps, money and photos that needed a place of their own.  And so began my paper crafting obsession.  I soon moved on to stamping and card making.  I am still learning a lot but I really enjoy making something personalised for the people in my life. 

I also enjoy baking and dabbling with cake decorating.  I have recently (re)learned how to knit and will probably try and pick up more projects that I won't have time for.  So for now, I'm going to try to make some progress with my cards.

Well, here goes nothing...