Thursday 17 September 2015

Leafy blessings

I just checked out the brand new Sparkle and Shine Challenge last night and I really liked the inspiration photo.  GREEN!  I loved the fern fronds and also wanted to include a circular element to tie in with the photo.

http://sparkleandshinechallenge.blogspot.co.nz/2015/09/sparkle-shine-challenge-14-sponsored-by.html
I don't usually do many shaker cards, but I must have been dreaming of them in my sleep.  Here's what I came up with this morning...
I started by stamping my Paper Smooches Reflections leaf sprig image several times with Versamark on Bazzill vellum.  I heat embossed them all with Zing! Green Metallic Finish embossing powder and then cut them out with the Reflections Leaves coordinating die.  I arranged them into a wreath shape and adhered together with glue dots.  I added some random Marshmallow and Sparkling Clear sequins from Pretty Pink Posh around the wreath.  The dove from Paper Smooches A Blessed Christmas was stamped in Memento Black on Distress Watercolour card and die cut with the coordinating die from Blessed Icons Dies.  I coloured it minimally with Copics and positioned on the wreath.
I cut some acetate with a circle die to fit behind the wreath and also a plain white circle of Neenah Solar White 80lb as the back panel of my shaker.  I did a bit of watercolour splattering on the plain white back panel with a paint brush and some watered down Distress inks in Mowed Lawn, Twisted Citron and Cracked Pistachio.  I adhered the acetate to the back of the vellum wreath with Multi Medium Matte and created a wall of foam dots around the edge of the back panel.  I piled various green, clear and iridescent sequins in my background and secured the wreath on top.
I stamped my sentiment from Paper Smooches A Holy Holiday with black Archival ink on to a Neenah Solar White 80lb A2 panel.  I adhered to my notecard and finally positioned my wreath on the front of the card.

I love how it turned out, with the wreath leaves overlapping and popped up from the notecard to give it some dimension.  The simple colour scheme keeps it fresh.  I am excited to send this one to someone for Christmas.  Only fourteen weeks to go until Christmas Eve...

Thanks for popping by to take a look and please feel free to leave me a comment!!

Tuesday 15 September 2015

Feathers and bows

I'm back with another card already!  I couldn't wait to get started on the new Paper Smooches SPARKS Challenge when I saw the inspiration photo.  I wanted to do a bit more watercolouring, so I decided to pull out my Sakura Koi Sketch Box swatches and roughly match up the paints with the colours in the photo.  The other element that caught my eye was the twine bows, and I knew I could team them up with my Paper Smooches Feathers Dies for something a bit different.

http://papersmoochessparks.blogspot.co.nz/2015/09/september-13-19-picture-perfect.htmlhttp://papersmoochessparks.blogspot.co.nz/
http://papersmoochessparks.blogspot.co.nz/2015/09/september-13-19-picture-perfect.html


Here is my finished card...

I started with a notecard cut from Neenah Desert Storm, and an extra panel cut to A2 size.
I did a wash of watercolour on Tim Holtz Watercolour card for each of the featured colours and then cut out Paper Smooches Feathers Dies from each colour once dried.  I tied some twine around each feather die cut and tied a small bow.
I stamped and white heat embossed my sentiment from Paper Smooches Sentiment Sampler on the front panel.  Using foam dots I adhered the feathers to the panel and then folded the excess twine over the top and securing with glue dots.  Finally, I adhered the panel to the front of the notecard, sandwiching the ends of the twine in between.

I thought this would be a fun fairly neutral his or hers card, but you could also change up the colours to make it a little more masculine or more feminine too.
Thanks for checking out my card!

Sunday 13 September 2015

Watercolour inspiration

It's been a rather busy few days around here, so not much time for making cards.  But I did manage to get a couple finished that I had been pondering over this week.  In anticipation for the new Watercolor for Card makers class staring soon at Online Card Classes, I have been playing around with my watercolour media and getting back in to the groove.  I even ordered some Zig Clean Color brush pens!!  I can't wait for class to start.  Anyway, I played around with a few colours and created a couple of cards.  The first one I used more of my new supplies from my Paper Smooches stash and I would like to submit it for the Paper Smooches Sparks Challenge.

http://papersmoochessparks.blogspot.co.nz/2015/09/september-6-12-anything-goes-wk1.htmlhttp://papersmoochessparks.blogspot.co.nz/


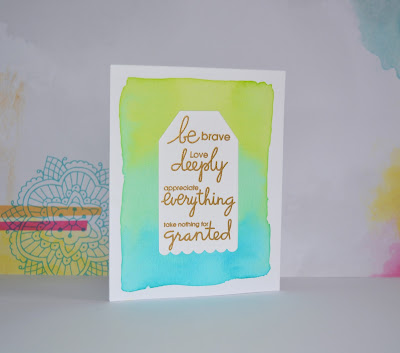
I started with a piece of Tim Holtz Watercolour card.  I pressed my Distress inks in Twisted Citron, Cracked Pistachio and Mermaid Lagoon on to an acrylic block and spritzed with a mini mister.  I picked up the colour with a wide brush and just played around with it until I was happy with the intensity of colour, and then left it to dry.
Once fully dry, I die cut the Paper Smooches Tag Scallop Die from the centre of my watercolour piece.
On my Neenah Solar white 110lb notecard I lined up where the die cut negative space would appear and stamped my sentiments from Paper Smooches Group Hugs, which I had previously arranged together on an acrylic block.  I used Versamark and Ranger Gold Super Fine Detail embossing powder and heat set.
Unfortunately this card was inspired by some sad news I received last week, which really reminded me just how fortunate I am.  I love that the soft watercolour is really the feature of the card but the Paper Smooches sentiments are so simple and beautiful.

Here's my second card in my watercolour theme...

I embossed the front of the notecard directly using the Carta Bella Ogee embossing folder and my Cuttlebug.
From one of my watercolour backgrounds (same Distress ink colours as above) I cut the sentiment using the Mama Elephant Happy and Birthday Script dies and adhered using my Xyron.  I added a few clear sparkling sequins from Pretty Pink Posh and it's done!  So simple and so pretty.

Thanks for taking the time to check out my cards.  Please feel free to leave a comment!

Sunday 6 September 2015

Swell fishies

I finally finished my card for the Paper Smooches SPARKS Challenge last night and I was so happy with the way it turned out.  I really wanted to use my new Paper Smooches Get Well Phrase die, and the script just reminded me of rolling waves, so I paired it up with the Paper Smooches Surf and Turf stamp set, and here's the result...

http://papersmoochessparks.blogspot.co.nz/2015/08/august-30-september-5-anything-goes-wk5.htmlhttp://papersmoochessparks.blogspot.co.nz/


I stared with a notecard cut from Neenah Solar White 110lb.  For the ocean I used the textured side of a piece of Tim Holtz watercolour card, to mimic water ripples.  I stamped and masked off my cute Surf and Turf fishies and then ink blended Mermaid Lagoon Distress ink up the panel.  I die cut the Get Well Phrase die and added some Frosted Lace Stickles to the words to give a bit of a salty glisten.  I coloured my fish with Copics and adhered the bottom section to the notecard.  I then nested the die cut back into the watercolour card and adhered down to the notecard.  I added the small stamped sentiment also from Surf and Turf in black Versafine, and finished off with a few Sparkling Clear sequins from Pretty Pink Posh.

Here's a close up of the shimmer on the words.  I thought it looked a bit like spray coming off the top of the waves, along with a few sparkly sequins.  I love the cute critters from Paper Smooches, they add a touch of fun to any card.


That's all for today.  I have a list of birthdays and occasions coming up, so I have many excuses to be crafting right now.  Better get cracking...
Thanks for checking out my card, I hope you liked it!


Saturday 5 September 2015

Neutral Feather

Another card I have been working on recently is this neutral birthday card as an entry to the Simon Says Stamp Monday Challenge.  The theme is Trio of Colours, and the colours I chose to work with were Distress ink pads in Peacock Feathers, Moved Lawn and Pumice Stone, teamed up with neutral kraft and off-white cardstock.

Here is my card...

I started with a notecard base cut from Hero Arts watercolour paper.  It has a nice cream colour and a really textured surface.  I cut a dark kraft panel from a Martha Stewart 6x6 paper pad, which I heat embossed with the Hero Arts Woodgrain design block and clear embossing powder.  I die cut a Memory Box tag from vellum and white heat embossed the Hero Arts Dictionary Greeting Happy Birthday stamp on it.
For my feather I inked up one of the Hero Arts Feathers with my Distress ink pads.  I stamped the pads in various places around the stamp to get varying colours.  I spritzed the inked stamp a little with a Mini Mister to blend the colours before stamping.  I fussy cut the feather and attached to the card with some foam dots, overlapping the vellum tag which I lightly adhered with Glossy Accents.
I added a couple of coordinating enamel dots and some natural paper twine to finish off the design, and adhered the kraft panel to the card base.

I really liked the colour combination, with the Distress inks blending into each other and creating slightly different shades.  It is a fairly simple design, but has a lot of texture and detail within the elements.
I also picked up some great inspiration for colour combinations from the Simon Monday Challenge Design Team.  I love trying out different colour schemes, but sometimes find it hard to get it right!

Thanks for taking a look at my card and please feel free to comment!

Thursday 3 September 2015

Negative space

This post has been a few days in the making, as I have two cards to share today.  I checked out CAS(E) This Sketch earlier this week, and I couldn't resist the sketch.  So cute, so I decided to create a card (or two!) for the challenge.  The sketch is often where I get stuck when getting inspired to start a clean and simple card.  I think this is easily I sketch I could use again, that's what I love about the CAS(E) This Sketch challenge, it offers so many amazing ideas that I can store away in my head for later!

This is the sketch for this week...

http://casethissketch.blogspot.co.nz/2015/08/case-this-sketch-138.html

Here is my finished card...

I started with Neenah Solar white as my notecard.  For the pink panel I used Picked Raspberry Distress Stain and just covered the entire piece of card with varying levels of saturation.  I spritzed a little water, a little Hero Arts unicorn white spray and some Hero Arts gold metallic spray to give a feeling of celebratory bubbles, like a glass of bright pink champagne!  Then I cut the section I wanted to use with one of the dies from the Memory Box Stitched Rectangle Layers set.
I used the Cheers Cutaway die from Winnie and Walter and cut it from my panel to use the negative space.  I mounted to my card base with foam dots.  I cut the black banner, die cut with a Project Life die and I heat embossed the small sentiment from Avery Elle Happy Hour stamp set with Hero Arts white embossing powder.  I added a tiny die cut heart from Paper Smooches Love & Cherish, which I coated with Tsukineko Brilliance Galaxy Gold pigment ink to tie in with the gold spray on the rectangle and a coat of glossy accents. I popped the banner on with a bit of double sided tape and foam dots where it adhered to the white notecard.
I really love the bright colour on this card, with a touch of metallic to really make it shine.

Here's another variation I made on the same idea using the negative space from die cutting.  But I added the colour and texture to the background, instead of the front panel.

For this card I created the background directly on the card front using the My Favorite Things Tiny Triangles stencil and some Dreamweaver embossing paste tinted with Tumbled Glass Distress Stain.  First though, I masked off the centre area with masking paper so that it would show plain white underneath the word die cut space.  I used the same Stitched Rectangle die from Memory Box, but paired it with the Friend Script die from Mama Elephant.  The small sentiment on the banner is from Winnie and Walter, The Big, the Bold and You.

I really love how these cards turned out.  The second one is quite calm, where the first one is bright and bubbly.  The same sketch but two quite different looks.
Thanks for taking the time to visit and check out my cards, I hope you enjoyed them!